Laminate Flooring Is Easy to Install
Laminate flooring has become a favorite among homeowners and DIYers for its affordability, durability, and realistic wood-look designs. But one of the biggest reasons for its popularity is how easy it is to install. If you’re considering a flooring upgrade and wondering whether you can handle the job yourself, this guide will walk you through the process, tools, and tips to help you succeed.
Why Laminate Flooring Is DIY-Friendly
Laminate flooring is designed with the homeowner in mind. Most modern laminate planks feature a click-lock system that allows the boards to snap together without glue, nails, or staples. This floating floor method means you can install laminate over most existing subfloors, including concrete, plywood, and vinyl, as long as the surface is clean, dry, and level.
Types of Laminate Installation
- Click-Lock (Floating Floor): The most common and easiest method. Planks snap together and float over the subfloor.
- Glue-Down: Less common and more labor-intensive. Requires adhesive and more prep time.
- Pre-Attached Underlayment: Some laminate planks come with underlayment already attached, simplifying the process further.
For more comparisons, visit Compare Pricing on Different Types of Flooring.
Tools You’ll Need
- Measuring tape
- Utility knife or jigsaw
- Spacers
- Tapping block
- Pull bar
- Rubber mallet
- Underlayment (if not pre-attached)
Recommended Amazon Products:
- REXBETI 44-Piece Laminate Flooring Installation Kit – Includes tapping block, pull bar, spacers, and mallet for a professional finish.
- QuietWalk Underlayment – 200 sq ft – Provides moisture protection and sound absorption for laminate floors.
- Bona Ultimate Hardwood Floor Care Kit – Safe for laminate and perfect for everyday cleaning.
Step-by-Step Installation Guide
1. Acclimate the Flooring
Let the laminate planks sit in the room for 48–72 hours to adjust to temperature and humidity. This prevents expansion or contraction after installation.
2. Prepare the Subfloor
Ensure the subfloor is clean, dry, and level. Remove any debris or old adhesive. If installing over concrete, use a vapor barrier.
3. Lay the Underlayment
Roll out the underlayment and tape the seams. This adds cushioning, reduces noise, and protects against moisture.
4. Plan Your Layout
Measure the room and decide on your starting wall. Use a chalk line to ensure straight rows. Stagger the joints by at least 6 inches for a natural look.
5. Install the First Row
Place spacers along the wall to maintain a 1/4-inch expansion gap. Lay the first plank with the tongue side facing the wall. Connect the next plank by angling and snapping it into place.
6. Continue Row by Row
Use a tapping block and mallet to ensure tight seams. Cut planks as needed using a jigsaw or laminate cutter. Use a pull bar to fit the last plank in each row.
7. Finish the Edges
Remove spacers and install baseboards or quarter-round molding to cover the expansion gap. Avoid nailing through the laminate itself.
Common Mistakes to Avoid
- Skipping acclimation
- Not using spacers for expansion gaps
- Failing to stagger joints
- Installing over an uneven subfloor
- Using the wrong tools or dull blades
How Long Does It Take?
For a 10x12 room, most DIYers can complete the job in a day. Larger or more complex spaces may take a weekend. The click-lock system significantly reduces installation time compared to glue-down or nail-down flooring.
Is It Really That Easy?
Yes—with the right tools, preparation, and patience, laminate flooring is one of the easiest flooring types to install. It’s a great project for beginners and offers a high-impact upgrade with minimal cost and effort.
Related Articles
- How to Make Angle Cuts on Laminate Flooring
- Five Reasons to Choose Laminate Flooring
- Flooring Installation Information
Conclusion
Laminate flooring is not only stylish and affordable—it’s also incredibly DIY-friendly. With a click-lock system, minimal tools, and a little preparation, you can transform your space in just a day or two. Whether you're updating a bedroom, living room, or hallway, laminate offers a durable and attractive solution that’s easy to install and easy to love.
For more flooring guides, installation tips, and product reviews, visit FloorCoveringWorld.com.
Most people who buy laminate flooring do so because they want hard flooring, but can’t afford solid hardwood flooring. How 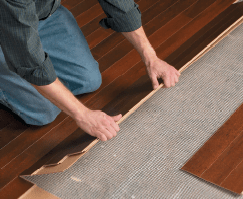 does laminate flooring compare to wood you ask? Is it a pretty good alternative and you might say ‘you get what you pay for’? It all depends on what’s most important to you. The biggest advantage of laminate flooring, apart from its attractive price point, is that it is so easy to install: you can do it yourself, quite easily, which is far from the case with wood flooring. Laminate systems tend to be designed like a jigsaw puzzle, to quickly and easily snap together. Laminate flooring is also often sturdier than wood – it is very hard wearing, to the point where a cheap shop like Ikea can give a much longer guarantee on their laminates than most wood floor shops can. It won’t fade or dent easily. While it’s no easier to clean that wood, it’s worth mentioning that it’s an awful lot easier to clean laminate that it is to clean carpet, if you were also considering putting that on your floor. Between the quality of wood and the cheapness of laminate, it’s hardly even worth considering carpet as an option these days. However, there are also quite a few disadvantages to laminate flooring. The first is the look and sound of it: it looks fake, and it sounds hollow. While the sound can be fixed with an underlay, the look will never be as unique as wood, as