Tools and Materials Needed for Installing Ceramic Tile Flooring
Installing ceramic tile flooring can be a daunting task, but with the right tools and materials, it can be a rewarding and cost-effective DIY project. Before you begin, it is important to gather all the necessary tools and materials to ensure a smooth and successful installation. In this article, we will discuss the essential tools and materials needed for installing ceramic tile flooring.
First and foremost, you will need the actual ceramic tiles. When purchasing tiles, it is important to buy a few extra pieces to account for any mistakes or future repairs. It is also recommended to buy tiles from the same batch to ensure consistency in color and size. Ceramic tiles come in a variety of sizes, shapes, and colors, so choose the ones that best fit your desired design and space.
Next, you will need tile adhesive or mortar. This is the material that will hold the tiles in place. There are different types of adhesives available, such as thin-set and mastic. Thin-set is recommended for larger tiles and high-moisture areas, while mastic is suitable for smaller tiles and low-moisture areas. It is important to choose the right adhesive for your specific project to ensure a strong and long-lasting bond.
In addition to adhesive, you will also need grout. Grout is the material that fills the gaps between tiles and provides a finished look. Similar to adhesive, there are different types of grout available, such as sanded and unsanded. Sanded grout is recommended for wider gaps, while unsanded grout is suitable for smaller gaps. It is important to choose the right grout for your project to achieve the desired look and durability.
To apply the adhesive and grout, you will need a trowel. A notched trowel is recommended for spreading adhesive evenly, while a grout float is used to push grout into the gaps between tiles. It is important to choose the right size trowel for your tiles to ensure proper coverage and adhesion.
Another essential tool for installing ceramic tile flooring is a tile cutter. This tool is used to cut tiles to fit around corners, edges, and fixtures. There are different types of tile cutters available, such as manual and electric. Manual tile cutters are suitable for smaller projects, while electric tile cutters are recommended for larger projects. It is important to practice using the tile cutter before starting your project to ensure clean and accurate cuts.
To ensure a level and evenly spaced installation, you will also need a level and spacers. A level is used to make sure the tiles are installed evenly, while spacers are used to create consistent gaps between tiles. These tools are crucial for achieving a professional-looking finish.
Other tools and materials that may be needed for installing ceramic tile flooring include a rubber mallet, tile nippers, a sponge, and a bucket for mixing grout. A rubber mallet is used to gently tap tiles into place, while tile nippers are used to make small cuts or adjustments to tiles. A sponge and bucket are used for cleaning excess grout and keeping the work area tidy.
In conclusion, installing ceramic tile flooring requires a variety of tools and materials. It is important to choose the right ones for your specific project to ensure a successful and long-lasting installation. With the right tools and materials, you can transform your space with beautiful and durable ceramic tile flooring.
Step-by-Step Guide to Installing Ceramic Tile Flooring

Ceramic tile flooring is a popular choice for many homeowners due to its durability, versatility, and aesthetic appeal. Whether you are looking to update your kitchen, bathroom, or any other room in your home, installing ceramic tile flooring is a great way to add value and style to your space. While the process may seem daunting, with the right tools and knowledge, it can be a relatively straightforward and rewarding DIY project. In this step-by-step guide, we will walk you through the process of installing ceramic tile flooring in your home.
Step 1: Gather Your Materials
Before you begin the installation process, it is essential to gather all the necessary materials. This includes ceramic tiles, tile adhesive, grout, spacers, a trowel, a tile cutter, a level, and a rubber mallet. It is also crucial to have safety equipment such as gloves, goggles, and a dust mask to protect yourself during the installation process.
Step 2: Prepare the Subfloor
The first step in installing ceramic tile flooring is to prepare the subfloor. The subfloor must be clean, dry, and level to ensure a smooth and even installation. If the subfloor is not level, you may need to use a self-leveling compound to even it out. Additionally, if you are installing ceramic tile over a wooden subfloor, it is recommended to use a cement backer board to provide a stable surface for the tiles.
Step 3: Measure and Plan
Before you start laying the tiles, it is crucial to measure the room and plan the layout. This will help you determine the number of tiles you will need and where to start the installation. It is recommended to start in the center of the room and work your way outwards. This will ensure that the tiles are evenly distributed and any cut tiles are placed in less noticeable areas.
Step 4: Apply Adhesive
Once you have measured and planned the layout, it is time to start laying the tiles. Begin by applying a layer of tile adhesive to a small section of the subfloor using a trowel. Make sure to spread the adhesive evenly and at a 45-degree angle to create ridges. This will help the tiles adhere to the subfloor better.
Step 5: Lay the Tiles
Carefully place the first tile in the adhesive, using spacers to create even gaps between the tiles. Continue laying the tiles in a straight line, making sure to press them firmly into the adhesive. Use a level to ensure that the tiles are even and adjust as needed. Once the first row is complete, continue with the rest of the tiles, working in small sections at a time.
Step 6: Cut Tiles as Needed
As you reach the edges of the room, you may need to cut tiles to fit. Use a tile cutter to make precise cuts, and remember to wear safety equipment when handling the tiles. Once the tiles are cut, place them in the adhesive and continue with the installation process.
Step 7: Allow Adhesive to Dry
After all the tiles are laid, allow the adhesive to dry for at least 24 hours before moving on to the next step. This will ensure that the tiles are securely attached to the subfloor.
Step 8: Apply Grout
Once the adhesive is dry, it is time to apply grout. Mix the grout according to the manufacturer's instructions and use a grout float to spread it over the tiles. Make sure to fill in all the gaps between the tiles, and wipe away any excess grout with a damp sponge. Allow the grout to dry for 24 hours.
Step 9: Clean and Seal
After the grout is dry, use a grout sealer to protect the grout from stains and water damage. Once the sealer is dry, clean the tiles with a damp cloth to remove any residue or haze.
Congratulations, you have successfully installed ceramic tile flooring in your home! With proper maintenance and care, your new flooring will last for years to come. Remember to clean up any spills or stains promptly and avoid using harsh chemicals that can damage the tiles. With this step-by-step guide, you can confidently install ceramic tile flooring and transform the look of your home.
Tips and Tricks for a Successful Ceramic Tile Flooring Installation
Ceramic tile flooring is a popular choice for many homeowners due to its durability, versatility, and aesthetic appeal. However, installing ceramic tile flooring can be a daunting task for those who have never done it before. With the right tools and techniques, anyone can successfully install ceramic tile flooring in their home. In this article, we will provide you with some tips and tricks for a successful ceramic tile flooring installation.
First and foremost, it is important to prepare the surface before installing ceramic tile flooring. The surface should be clean, dry, and level. Any bumps or unevenness in the surface can cause the tiles to crack or become loose over time. Use a level and a straight edge to check for any imperfections and make necessary repairs before proceeding with the installation.
Next, gather all the necessary tools and materials for the installation. This includes ceramic tiles, tile adhesive, trowel, tile spacers, grout, grout float, and a tile cutter. It is important to use high-quality materials to ensure a long-lasting and professional-looking installation.
Before applying the adhesive, it is recommended to lay out the tiles on the floor to determine the best layout and pattern. This will also help you estimate the number of tiles needed and avoid any mistakes during the installation process. It is also important to consider the direction of the tiles and how they will flow with the rest of the room.
When applying the adhesive, make sure to follow the manufacturer's instructions. Use a notched trowel to spread the adhesive evenly on the surface, making sure to cover the entire area. It is important to work in small sections to prevent the adhesive from drying out before the tiles are placed.
As you lay the tiles, use tile spacers to ensure even spacing between each tile. This will help create a professional and uniform look. It is also important to periodically check that the tiles are level and adjust as needed.
Once all the tiles are in place, allow the adhesive to dry completely before grouting. Grout is used to fill the gaps between the tiles and provide a finished look. Mix the grout according to the manufacturer's instructions and use a grout float to spread it over the tiles. Make sure to remove any excess grout with a damp sponge before it dries.
After the grout has dried, use a grout sealer to protect the grout from stains and moisture. This step is especially important for areas with high traffic or exposure to water, such as bathrooms and kitchens.
In addition to these tips, here are some additional tricks to help you achieve a successful ceramic tile flooring installation:
- Use a tile cutter to make precise cuts for tiles that need to fit around corners or edges.
- To prevent tiles from cracking, avoid stepping on them until the adhesive and grout have fully dried.
- If you are installing tiles in a bathroom or kitchen, make sure to use a waterproof adhesive and grout to prevent water damage.
- Consider using a tile leveling system to ensure a perfectly flat and even surface.
- If you are installing tiles on a concrete subfloor, it is recommended to use a crack isolation membrane to prevent any cracks in the concrete from affecting the tiles.
In conclusion, installing ceramic tile flooring may seem like a daunting task, but with the right tools, materials, and techniques, anyone can achieve a successful installation. Remember to properly prepare the surface, use high-quality materials, and follow the manufacturer's instructions. With these tips and tricks, you can have a beautiful and durable ceramic tile floor in your home.
Grid L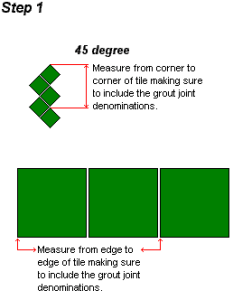 ayout
ayout
There is no better way to lay your ceramic tile floor out than to pop chalk lines into a grid styled layout. Why? For starters, a grid styled layout allows the installer to see exactly where each tile and cut is going to fall. This is especially convenient on high footage floors. In addition, it allows for the installation of a ceramic tile floor that is consistently square throughout. It is very important that you maintain accurate measurements throughout the layout process.
Measure Ceramic Tile For Chalk Guide Lines
Sort through your floor tile to find the largest ceramic tiles of the batch. Lay roughly 3 linear feet of this tile on end to end making sure to insert spacers, if necessary, between the tile grout joints. Measure from the edge of the outermost tile to the edge of the closest 2' of tile making sure to include the grout joint denominations. Record this measurement.
Pop Guide Lines & Check To See If Tile Layout Is Square
Find a co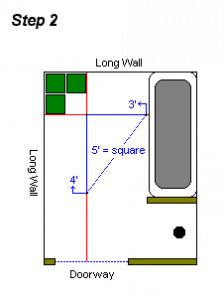 rner of the room to be tiled that has the longest and straightest walls. Usually these will be exterior and or interior load bearing walls. Using the figure you recorded from Step 1, measure and mark the floor off one end of the wall and do the same on the other end. Pop a chalk line between the two marks. Repeat this step for the intersecting wall. To see if the lines are square, find the spot where the chalk lines intersect and highlight the center. Measure 36" out from the center and mark the chalk line accordingly. Measure 48" out on 90 degrees and mark the chalk line accordingly. Now, measure the distance between the center of the two marks you have made. It should amount to 60". If it does not, either your measurement off the walls were not accurate or one or both of your walls are out of square. Recheck your measurements and re-pop the lines if necessary. If your measurements were accurate check each wall to determined which one is out of square. In most cases it will be an interior wall or the shortest of the two walls. Adjust the chalk line that is out of square and recheck to see if square.
Pop Chalk Lines Into Grid Styled Layout
In most cases it is best to pop the chalk lines off of your longest wall first. Using the same figure from Step 1, measure, mark, and pop the lines using the chalk line you started with in Step 2 as your starting point. Check your measurements and chalk lines regularly for accuracy and to see if square. Repeat this step until entire floor has been properly grid out.
Before Installing Ceramic Tile
Start you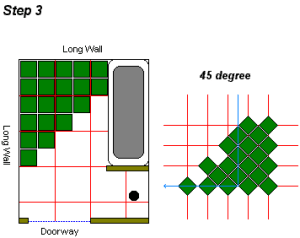 r ceramic tile installation in the corner you popped the two original lines and remember to keep the first grout joint to the wall. Use a 4' level to keep your tiles straight or insert spacers on each corner of the tile joints. Typically, grout joint spacing is kept between 1/4" to 5/16" wide. If the ceramic tile you selected varies in size by more than an 1/8" then spacers will prove to be of little use. It is much more important to keep the floor tile properly aligned to the guide lines within each grid square rather than to keep the grout joint widths consistently sized.